Flutter | มาคุยกับ Native ด้วย Platform Channel เบื้องต้นกัน
Created on Jul 05, 2020
F
lutter สามารถสร้างหน้าตา และหลักการทำงาน ของแอปเราได้แทบไร้ขีดจำกัด แต่ถึงจุดนึงก็มีบางครั้งที่เราจำเป็นต้องทำมากกว่านั้น โดยเฉพาะการดึง Native feature มาใช้ อย่างเช่น biometric authentication สแกนลายนิ้วมือ ซึ่งโดยทั่วไปเราสามารถใช้ packages จาก pub.dev แล้วเรียกใช้งานใน dart ได้เลย เหมือนมีเวทมนตร์ไม่มีผิด
แล้วยิ่งตอนนี้ มีกลุ่มคนมากมายมาช่วยกันสร้าง packages ให้เราใช้ ซึ่งครอบคลุมการใช้งานส่วนใหญ่ แต่อย่างไรก็ตาม ก็คงมีบางครั้งที่สิ่งที่เราอยากได้จาก Native แต่ยังไม่มีใครทำไว้ เลยถือโอกาสนี้ มาทำความเข้าใจ ว่ามันทำงานกันอย่างไร และลองสร้าง Platform channel แบบง่ายๆกัน
มาทำความเข้าใจ Platform Channel กันก่อน
ในบทความนี้ เราจะเจาะจง Native เฉพาะ Android Kotlin กับ iOS Swift ซึ่งเป็น mobile platform ส่วน web กับ desktop ไว้รอมันเข้า stable ก่อนละกัน
เราจะเห็นว่า Flutter สื่อสารกับ host ผ่าน channel ตามรูปด้านล่าง
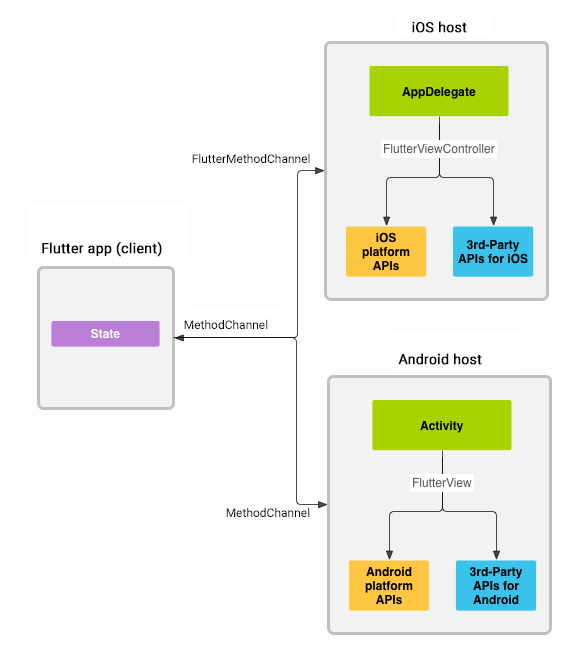
ตัวข้อความที่ส่งไปมา รองรับการใช้ ประเภทตัวแปรพื้นฐานทั้งหมด เช่น bool int String List Map รายละเอียดเพิ่มเติ่ม และหนึ่งในตัวอย่าง MethodChannel สามารถดูได้จาก docs ต้นทางเลย
ในบทความนี้ เราจะอธิบายภาพรวมมากกว่านี้
Flutter สามารถสื่อสารผ่าน channel ได้ 2 ประเภท
- Method Channel
ใช้เมื่อเราต้องการเรียกฟังก์ชั่นเป็นครั้งๆไป เรียกแต่ละครั้ง เราจะได้รับ
Future<dynamic>Flutter <—> Native Host
เราสามารถ invoke หรือเรียกจากฝั่งไหนก็ได้
- Event Channel
ใช้เมื่อเราต้องการรับค่าจากฟังก์ชั่นอย่างต่อเนื่อง เมื่อเรารับมา จะได้รับ
Stream<dynamic>Flutter < — Native Host
ตัว Flutter จะฟังข้อความจาก Native ได้อย่างเดียว
เพื่อให้เห็นภาพมากขึ้น เรามาลองลงมือเขียนโค๊ดกันหน่อย
เราจะแบ่งเป็นส่วนของ Method Channel กับ Event Channel
ผลลัพธ์สุดท้ายจะออกมาประมาณนี้
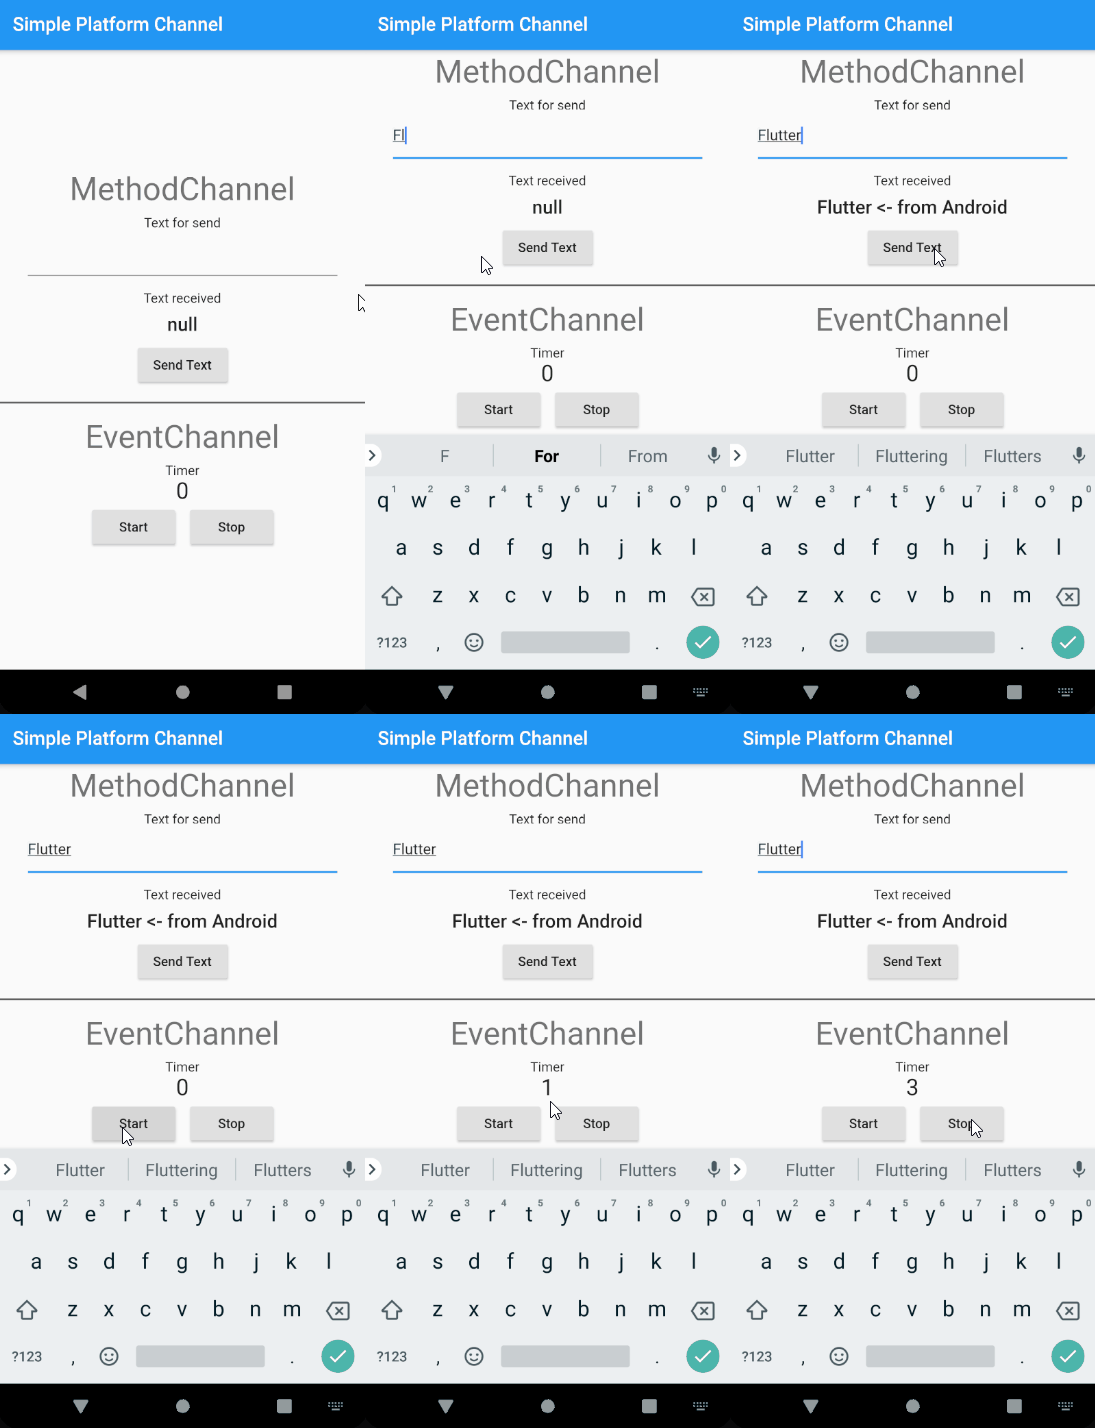
ใน Method Channel เราจะส่งข้อความไปที่ Native แล้วให้ Native ส่งข้อความที่เติมคำลงท้ายกลับมา
ส่วน Event Channel จะเราฟัง timer จากฝั่ง Native ซึ่งเราจะเริ่มหรือหยุดฟังก็ได้
หมายเหตุ จะพยายามทำให้โครงสร้างโค๊ดของฝั่ง Kotlin กับ Swift ใกล้เคียงกันที่สุด แต่ถ้ามีพื้นฐานของทั้ง 2 ภาษา จะช่วยได้มาก
เริ่มได้ 🔰
มาเตรียมตัวกันก่อน
หลังจากสร้างโปรเจค Flutter ใหม่ โครงสร้างไฟล์ที่เราจะเข้าไปแก้ไขมีตาม
| flutter_simple_platform_channel | |
| ├───android | |
| │ ├───app | |
| │ │ │───src | |
| │ │ │ └───main | |
| │ │ │ └───kotlin | |
| │ │ │ └───com | |
| │ │ │ └───example | |
| │ │ │ └───flutter_simple_platform_channel | |
| │ │ │ └───MainActivity.kt | |
| │ │ └───build.gradle | |
| ├───ios | |
| │ └───Runner | |
| │ └───AppDelegate.swift | |
| └───lib | |
| ├───main.dart | |
| └───platform_channel.dart |
ไฟล์ที่เราสร้างเพิ่มจะมีเพียง
lib/platform_channel.dartเริ่มทำ Method Channel กันก่อน
มาดูส่วนของ Flutter ก่อน
เขียน ฟังก์ชั่นมาใช้งาน Method Channel ที่
lib/platform_channel.dart| import 'dart:async'; | |
| import 'package:flutter/services.dart'; | |
| class PlatformChannel { | |
| /// ประกาศชื่อช่อง channel | |
| static const MethodChannel _methodChannel = const MethodChannel('sample.test.platform/text'); | |
| // static const EventChannel _eventChannel = const EventChannel('sample.test.platform/number'); | |
| /// MethodChannel com.test.platform/text | |
| Future<String> getStringReturnFromPlatform(String text) async { | |
| return await _methodChannel.invokeMethod<String>( | |
| 'sendtext', {'message': text}); | |
| } | |
| /// EventChannel com.test.platform/number | |
| // มาใส่ฟังก์ชั่น EventChannel ตรงนี้ | |
| } |
- ประกาศตัวแปร
เป็นช่องทางสื่อสารแบบ Method Channel_methodChannel - ฟังก์ชั่น
รับข้อความมาแล้ว invokeMethod ส่งไป Native ในแบบตัวแปร MapgetStringReturnFromPlatform(String text)
แล้วรับคืนกลับมาเป็น String{'message': text}
หมดแล้วฝั่ง Flutter
ไปรับมือกับข้อความ บน Kotlin กันต่อ
ที่ไฟล์
android/app/src/main/kotlin/com/example/flutter_simple_platform_channel/MainActivity.kt| class MainActivity: FlutterActivity() { | |
| // เราจะรับมือกับ Method และ Event Channel ในนี้ | |
| } |
แก้เป็นตามนี้
| package com.example.flutter_simple_platform_channel | |
| import androidx.annotation.NonNull | |
| import io.flutter.Log | |
| import io.flutter.embedding.android.FlutterActivity | |
| import io.flutter.embedding.engine.FlutterEngine | |
| import io.flutter.plugin.common.EventChannel | |
| class MainActivity: FlutterActivity() { | |
| private val METHODCHANNEL = "sample.test.platform/text" | |
| override fun configureFlutterEngine(@NonNull flutterEngine: FlutterEngine) { | |
| super.configureFlutterEngine(flutterEngine) | |
| MethodChannel(flutterEngine.dartExecutor.binaryMessenger, METHODCHANNEL).setMethodCallHandler { | |
| call, result -> | |
| if (call.method == "sendtext") { | |
| // เมื่อเรา invokeMethod("sendtext") จะรันด้านล่างนี้ | |
| var text = call.argument<String>("message") | |
| var returnText = getStringReturnToDart(text as String) | |
| // ส่งข้อความกลับไป Flutter | |
| result.success(returnText) | |
| // ปริ้น log ไปที่ syslog ของ Flutter | |
| Log.d("sendtext","\$returnText") | |
| } else { | |
| // ถ้าเรา invokeMethod ที่ไม่ได้รองรับ | |
| result.notImplemented() | |
| } | |
| } | |
| /// เดี๋ยวมาเพิ่ม EventChannel ตรงนี้ | |
| } | |
| /// ฟังก์ชั่น เอาข้อความมาต่อท้าย | |
| private fun getStringReturnToDart(text: String): String { | |
| return text + " <- from Android" | |
| } | |
| } |
ทุกครั้งที่เรารันแอป class
MainActivityfun configureFlutterEngine(@NonNull flutterEngine: FlutterEngine)MethodChannel(flutterEngine.dartExecutor.binaryMessenger, METHODCHANNEL).setMethodCallHandler“sendtext”ไปดูฝั่ง Swift บ้าง
ที่ไฟล์
ios/Runner/AppDelegate.swift| @UIApplicationMain | |
| @objc class AppDelegate: FlutterAppDelegate { | |
| override func application( | |
| _ application: UIApplication, | |
| didFinishLaunchingWithOptions launchOptions: [UIApplication.LaunchOptionsKey: Any]? | |
| ) -> Bool { | |
| /// Method กับ Event Channel ของเราจะแทรกตรงนี้ | |
| GeneratedPluginRegistrant.register(with: self) | |
| return super.application(application, didFinishLaunchingWithOptions: launchOptions) | |
| } | |
| } |
สิ่งที่เราจะแทรกจะมี 2 ส่วน เหมือนบน kotlin คือ
MethodChannelfunc getStringReturnToDart(text: String)| import UIKit | |
| import Flutter | |
| @UIApplicationMain | |
| @objc class AppDelegate: FlutterAppDelegate { | |
| override func application( | |
| _ application: UIApplication, | |
| didFinishLaunchingWithOptions launchOptions: [UIApplication.LaunchOptionsKey: Any]? | |
| ) -> Bool { | |
| let METHODCHANNEL = "sample.test.platform/text" | |
| //let EVENTCHANNEL = "sample.test.platform/number" | |
| let controller : FlutterViewController = window?.rootViewController as! FlutterViewController | |
| /// ใน swift เราประกาศตัวแปร methodChannel ไว้ก่อนเลย จริงๆบน kotlin ก็ทำแบบเดียวกันได้ | |
| let methodChannel = FlutterMethodChannel(name: METHODCHANNEL, | |
| binaryMessenger: controller.binaryMessenger) | |
| /// หลังจากประกาศ แล้วถึงมาเรียก .setMethodCallHandler | |
| methodChannel.setMethodCallHandler({ | |
| (call: FlutterMethodCall, result: @escaping FlutterResult) -> Void in | |
| // Note: this method is invoked on the UI thread. | |
| switch call.method { | |
| case "sendtext": | |
| // เมื่อเรา invokeMethod("sendtext") จะรันด้านล่างนี้ | |
| let argument: [String: String] = call.arguments as! [String: String] | |
| let returntext = self.getStringReturnToDart(text: argument["message"]!) | |
| // ปริ้น log ไปที่ syslog ของ Flutter | |
| NSLog("from iOS: send text back") | |
| // ส่งข้อความกลับไป Flutter | |
| result(returntext) | |
| default: | |
| // ถ้าเรา invokeMethod ที่ไม่ได้รองรับ | |
| result(FlutterMethodNotImplemented) | |
| } | |
| }) | |
| GeneratedPluginRegistrant.register(with: self) | |
| return super.application(application, didFinishLaunchingWithOptions: launchOptions) | |
| } | |
| private func getStringReturnToDart(text: String) -> String { | |
| return text + " <- from iOS" | |
| } | |
| } |
หลักการก็จะคล้ายกับ Kotlin แต่รอบนี้ชื่อ class จะเป็น AppDelegate แทน และเวลาส่งข้อความกลับใน Kotlin จะเรียก result.success(msg) แต่ใน Swift จะเป็น result(msg)
มาส่วนแสดงผลกันบ้าง
กลับไปแก้ที่
lib/main.dart| import 'dart:async'; | |
| import 'package:flutter/material.dart'; | |
| import './platform_channel.dart'; | |
| void main() { | |
| runApp(MyApp()); | |
| } | |
| class MyApp extends StatelessWidget { | |
| @override | |
| Widget build(BuildContext context) { | |
| return MaterialApp( | |
| debugShowCheckedModeBanner: false, | |
| title: 'Simple Platform Channel', | |
| theme: ThemeData( | |
| primarySwatch: Colors.blue, | |
| visualDensity: VisualDensity.adaptivePlatformDensity, | |
| ), | |
| home: MyHomePage(title: 'Simple Platform Channel'), | |
| ); | |
| } | |
| } | |
| class MyHomePage extends StatefulWidget { | |
| MyHomePage({Key key, this.title}) : super(key: key); | |
| final String title; | |
| @override | |
| _MyHomePageState createState() => _MyHomePageState(); | |
| } | |
| class _MyHomePageState extends State<MyHomePage> { | |
| TextEditingController _textController; | |
| String _textRecieved; | |
| PlatformChannel _platformChannel; | |
| @override | |
| void initState() { | |
| _textController = TextEditingController(text: ''); | |
| _platformChannel = PlatformChannel(); | |
| super.initState(); | |
| } | |
| @override | |
| Widget build(BuildContext context) { | |
| return Scaffold( | |
| appBar: AppBar( | |
| title: Text(widget.title), | |
| ), | |
| body: Center( | |
| child: Column( | |
| mainAxisAlignment: MainAxisAlignment.center, | |
| children: <Widget>[ | |
| _buildMethodChannel(context), | |
| Divider( | |
| height: 32, | |
| thickness: 2, | |
| color: Colors.grey[700], | |
| ), | |
| _buildEventChannel(context), | |
| ], | |
| ), | |
| ), | |
| ); | |
| } | |
| Column _buildMethodChannel(BuildContext context) { | |
| return Column( | |
| children: <Widget>[ | |
| Text( | |
| 'MethodChannel', | |
| style: Theme.of(context).textTheme.headline4, | |
| ), | |
| SizedBox( | |
| height: 8, | |
| ), | |
| Text( | |
| 'Text for send', | |
| ), | |
| Padding( | |
| padding: const EdgeInsets.symmetric(horizontal: 32.0), | |
| child: TextFormField( | |
| controller: _textController, | |
| ), | |
| ), | |
| SizedBox( | |
| height: 16, | |
| ), | |
| Text( | |
| 'Text received', | |
| ), | |
| SizedBox( | |
| height: 8, | |
| ), | |
| Text( | |
| '\$_textRecieved', | |
| style: Theme.of(context).textTheme.headline6, | |
| ), | |
| SizedBox( | |
| height: 8, | |
| ), | |
| RaisedButton( | |
| onPressed: () async { | |
| _textRecieved = await _platformChannel | |
| .getStringReturnFromPlatform(_textController.text); | |
| setState(() {}); | |
| }, | |
| child: Text("Send Text")), | |
| ], | |
| ); | |
| } | |
| Widget _buildEventChannel(BuildContext context) { | |
| /// เราจะมาแก้หลังสร้าง EventChannel | |
| return SizedBox(); | |
| } | |
| } |
เมื่อรันแล้วจะได้ผลลัพธ์ ตามนี้

มาต่อกับ Event Channel
| class PlatformChannel { | |
| /* _methodChannel เดิม */ | |
| // เพิ่ม | |
| static const EventChannel _eventChannel = const EventChannel('sample.test.platform/number'); | |
| /* getStringReturnFromPlatform เดิม */ | |
| // เพิ่ม | |
| /// EventChannel com.test.platform/number | |
| Stream<int> get getTimerStream => _eventChannel.receiveBroadcastStream().map((dynamic event) => event as int); | |
| } |
เริ่มที่ Flutter เหมือนเดิม
มาเติม Event Channel ที่ไฟล์
lib/platform_channel.dartเพิ่มอีก 2 ส่วน
หรือช่องทางไว้ฟัง Stream_eventChannel
ฟังก์ชั่นรับ Stream แต่เนื่องจากข้อความที่ส่งผ่าน Method/Event Channel ไม่ได้บ่งบอกประเภทตัวแปร (ถึงแม้เราเองจะรู้) จึงต้องgetTimerStream
เพื่อทำให้ dart รู้ประเภทตัวแปร.map((dynamic event) => event as int)
เราจะกลับมากับวิธีนำไปใช้ต่อหลังไปเขียนส่วน Native
ไป Kotlin กันต่อ
เนื่องจากเราใช้ ReactiveX ในการทำ Timer เลยต้องไปเพิ่มใน dependency กันก่อน
มาเพิ่มที่
android/app/build.gradle| // ข้ามลงมาที่ dependencies | |
| dependencies { | |
| // implementation เดิม | |
| // เพิ่ม | |
| implementation "io.reactivex.rxjava2:rxjava:2.2.7" | |
| implementation "io.reactivex.rxjava2:rxandroid:2.1.1" | |
| } |
แล้วแก้ที่ไฟล์
MainActivity.kt| /* import เดิม */ | |
| // เพิ่ม | |
| import io.flutter.plugin.common.MethodChannel | |
| import io.reactivex.Observable | |
| import io.reactivex.android.schedulers.AndroidSchedulers | |
| import io.reactivex.disposables.Disposable | |
| import java.util.concurrent.TimeUnit | |
| class MainActivity: FlutterActivity() { | |
| private val METHODCHANNEL = "sample.test.platform/text" | |
| // เพิ่มประกาศตัวแปร 3 ตัว | |
| private val EVENTCHANNEL = "sample.test.platform/number" | |
| private val TAG = "eventListener" | |
| private var timerSubscription: Disposable? = null // ทำหน้าที่ Observer สามารถทำลายหลังใช้งานเสร็จได้ | |
| override fun configureFlutterEngine(@NonNull flutterEngine: FlutterEngine) { | |
| super.configureFlutterEngine(flutterEngine) | |
| /* MethodChannel เดิม */ | |
| // เพิ่ม EventChannel | |
| EventChannel(flutterEngine.dartExecutor.binaryMessenger, EVENTCHANNEL).setStreamHandler( | |
| object : EventChannel.StreamHandler { | |
| override fun onListen(args: Any?, events: EventChannel.EventSink?) { | |
| Log.w(TAG, "adding listener") | |
| // สร้าง Observable จาก reactivex แล้วให้ timerSubscription เป็น Observer | |
| timerSubscription = Observable | |
| // รันทุกๆ 1 วินาที เริ่มที่ 0 | |
| .interval(0, 1, TimeUnit.SECONDS) | |
| .observeOn(AndroidSchedulers.mainThread()) | |
| .subscribe( | |
| { timer: Long -> | |
| Log.w(TAG, "onNext: Android timer event \$timer") | |
| // ส่งเวลา timer ด้วย events | |
| events?.success(timer) | |
| }, | |
| { error: Throwable -> | |
| Log.e(TAG, "onError: error in emitting timer", error) | |
| events?.error("STREAM", "Error in processing observable", error.message) | |
| }, | |
| { Log.w(TAG, "Complete: closing the timer observable") } | |
| ) | |
| } | |
| override fun onCancel(args: Any?) { | |
| Log.w(TAG, "cancelling listener") | |
| if (timerSubscription != null) { | |
| // ให้ Observer แจ้งยกเลิกการฟัง | |
| timerSubscription!!.dispose() | |
| // เคลียค่าในตัวแปร | |
| timerSubscription = null | |
| } | |
| } | |
| } | |
| ) | |
| } | |
| /* getStringReturnToDart เดิม */ | |
| } |
เช่นเดิม ตั้งค่า
EventChannel(flutterEngine.dartExecutor.binaryMessenger, EVENTCHANNEL).setStreamHandlerEventChannel.StreamHandlerมาฝั่ง Swift บ้าง
เพิ่ม dependency ที่ Xcode
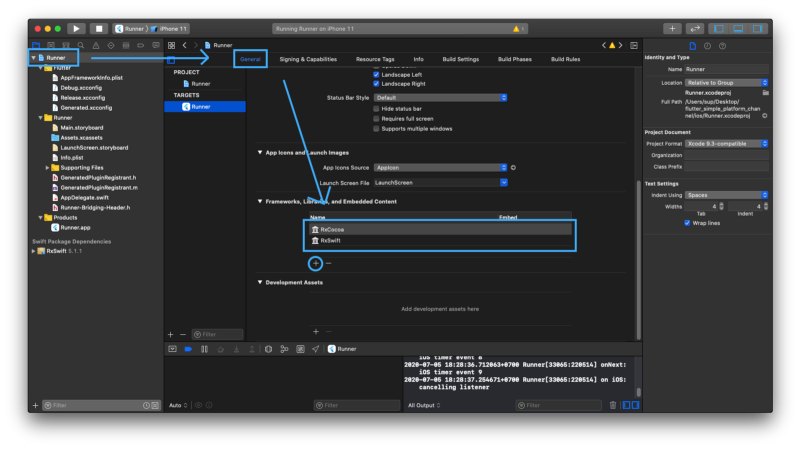
รายละเอียดเพิ่มเติม ลองอ่านจาก https://github.com/ReactiveX/RxSwift ได้
มาดูส่วนโค๊ดต่อที่
AppDelegate.swift| /* import เดิม */ | |
| // เพิ่ม import | |
| import RxSwift | |
| @UIApplicationMain | |
| @objc class AppDelegate: FlutterAppDelegate { | |
| override func application( | |
| _ application: UIApplication, | |
| didFinishLaunchingWithOptions launchOptions: [UIApplication.LaunchOptionsKey: Any]? | |
| ) -> Bool { | |
| let METHODCHANNEL = "sample.test.platform/text" | |
| // เพิ่ม EVENTCHANNEL | |
| let EVENTCHANNEL = "sample.test.platform/number" | |
| let controller : FlutterViewController = window?.rootViewController as! FlutterViewController | |
| let methodChannel = FlutterMethodChannel(name: METHODCHANNEL, | |
| binaryMessenger: controller.binaryMessenger) | |
| /* MethodChannel เดิม */ | |
| // เพิ่ม | |
| let eventChannel = FlutterEventChannel(name: EVENTCHANNEL, binaryMessenger: controller.binaryMessenger) | |
| let handler = TimerStreamHandler() | |
| eventChannel.setStreamHandler(handler) | |
| GeneratedPluginRegistrant.register(with: self) | |
| return super.application(application, didFinishLaunchingWithOptions: launchOptions) | |
| } | |
| /* ฟังก์ชั่น getStringReturnToDart เดิม */ | |
| // เพิ่ม class | |
| class TimerStreamHandler: NSObject, FlutterStreamHandler { | |
| var timerSubscription : Disposable? | |
| func onListen(withArguments arguments: Any?, eventSink events: @escaping FlutterEventSink) -> FlutterError? { | |
| NSLog("on iOS: onListen") | |
| timerSubscription = Observable<Int>.timer(0, period: 1, scheduler: MainScheduler.instance) | |
| .subscribe(onNext: { value in | |
| NSLog("onNext: iOS timer event \\(value)") | |
| events(value) | |
| }) | |
| return nil | |
| } | |
| func onCancel(withArguments arguments: Any?) -> FlutterError? { | |
| NSLog("on iOS: cancelling listener") | |
| timerSubscription?.dispose() | |
| return nil | |
| } | |
| } | |
| } |
หลักการตรงนี้เหมือนกับฝั่ง Kotlin เลย ต่างกันแค่ส่วน สร้าง class
TimerStreamHandlerhandler.setStreamHandler(handler)พร้อมแล้วนำมาใช้แสดงผลกัน
กลับมาแก้ที่
main.dart| /* ด้านบนเหมือนเดิม ข้ามมาส่วนนี้เลย */ | |
| class _MyHomePageState extends State<MyHomePage> { | |
| /* ประกาศตัวแปรเดิม */ | |
| // เพิ่ม | |
| int _time; | |
| StreamSubscription _timerSubscription; | |
| @override | |
| void initState() { | |
| /* initState เดิม */ | |
| // เพิ่ม | |
| _time = 0; | |
| super.initState(); | |
| } | |
| /* build เดิม */ | |
| /* _buildMethodChannel เดิม */ | |
| // แก้ _buildEventChannel ให้ใช้ Event Channel ที่เราสร้าง | |
| Column _buildEventChannel(BuildContext context) { | |
| return Column( | |
| children: <Widget>[ | |
| Text( | |
| 'EventChannel', | |
| style: Theme.of(context).textTheme.headline4, | |
| ), | |
| SizedBox( | |
| height: 8, | |
| ), | |
| Text("Timer"), | |
| Text( | |
| "\$_time", | |
| style: Theme.of(context).textTheme.headline5, | |
| ), | |
| Row( | |
| mainAxisAlignment: MainAxisAlignment.center, | |
| children: <Widget>[ | |
| RaisedButton( | |
| onPressed: () async { | |
| // ให้ _timerSubscription เป็น Observer | |
| _timerSubscription = _platformChannel.getTimerStream | |
| // เมื่อ .listen จะเป็นการเรียก Native ที่ onListen | |
| .listen((int time) { | |
| setState(() { | |
| _time = time; | |
| }); | |
| }); | |
| }, | |
| child: Text("Start")), | |
| SizedBox(width: 16), | |
| RaisedButton( | |
| onPressed: () async { | |
| // เมื่อ .cancel จะเป็นการเรียก Native ที่ onCancel | |
| _timerSubscription.cancel(); | |
| }, | |
| child: Text("Stop")), | |
| ]) | |
| ], | |
| ); | |
| } | |
| } |
แล้วเราก็จะได้หน้าตาสุดท้ายออกมา
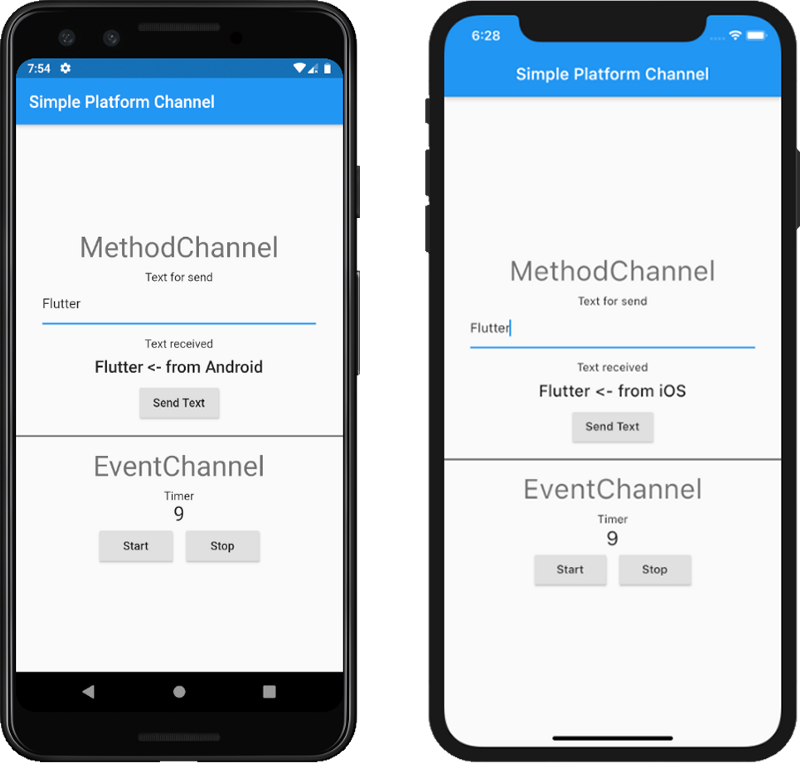
ในที่สุด Method Channel กับ Event Channel ของเราก็เสร็จเรียบร้อยแล้ว ถึงแม้เราจะไม่ได้เรียกใช้อะไรพิเศษจาก Native แต่อย่างน้อยก็เริ่มคุ้นเคยการวิธีการทำงานของ Method Channel กับ Event Channel แล้ว ที่เหลือถ้าใช้ Kotlin/Swift ได้ ก็นำไปต่อยอดได้แล้ว
แถมอีกหน่อย
มาถึงจุดนี้แล้ว อาจจะสังเกตได้ว่า Method Channel เราเริ่มเรียกที่ฝั่ง Flutter อย่างเดียว ถ้าอยากเรียกจากฝั่ง Native บ้าง ก็จะมีการเซ็ตอัพ คล้ายๆกัน แต่ทำที่คนละฝั่ง
ฝั่ง Flutter
_methodChannel.setMethodCallHandler((call) => 'เช็ค call.method แล้วทำเหมือนใน Native');
ฝั่ง Native
methodChannel.invokeMethod(method, ข้อความ)
จบแล้วอีกหนึ่งบทความ ถ้าใครตามไม่ทัน หรืออยากลองรันเลย ก็ clone Source code ได้ตามนี้