Flutter | มาลองทำแอป Icon Showcase || Part II อนิเมชั่น
Created on Jan 06, 2020
พาร์ทอื่นๆ
- Flutter | มาลองทำแอป Icon Showcase || Part I การดีไซน์
- Flutter | มาลองทำแอป Icon Showcase || Part Extra Bloc+Animation
เริ่ม
กลับมาต่อกับพาร์ทที่ 2 ครั้งนี้เราจะมาเพิ่มในส่วนของอนิเมชั่น ถ้าใครอยากกลับไปดูการดีไซน์ หรือคำอธิบายของ Widget แต่ละตัวสามารถไปดูได้ที่พาร์ทที่ 1 ตามลิงค์ด้านล่างนี้เลย
หรือใครอยากต่อยอดจากอันก่อนหน้า มาลองทำเฉพาะส่วนอนิเมชั่นเพิ่ม ก็สามารถไปโหลดจาก Github ได้ โดยคำอธิบายต่างๆในครั้งนี้เราก็จะเอาโค็ดจากครั้งที่แล้วมาทำต่อ
เป้าหมายสุดท้ายเรา จะทำให้ออกมาตามนี้
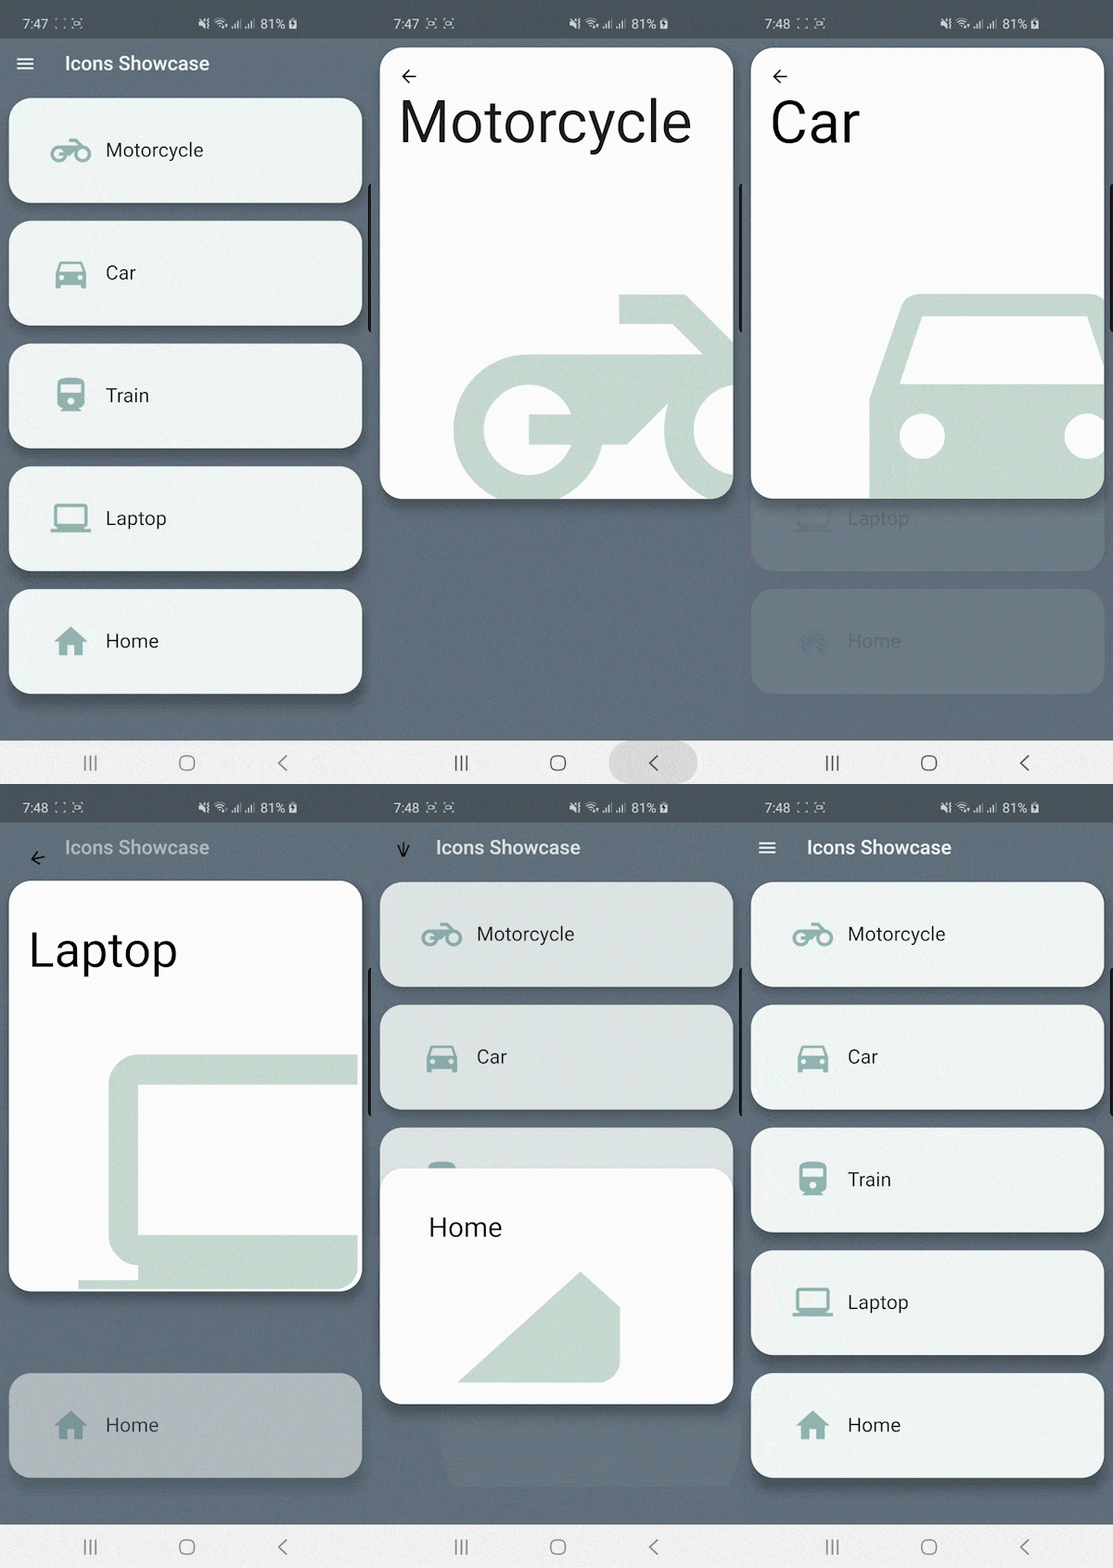
เป้าหมายของเราคือ จะสร้างอนิเมชั่นสำหรับเวลาเปลี่ยนหน้า ให้มันดูลื่นไหล โดยเราจะทำ 2 จุด
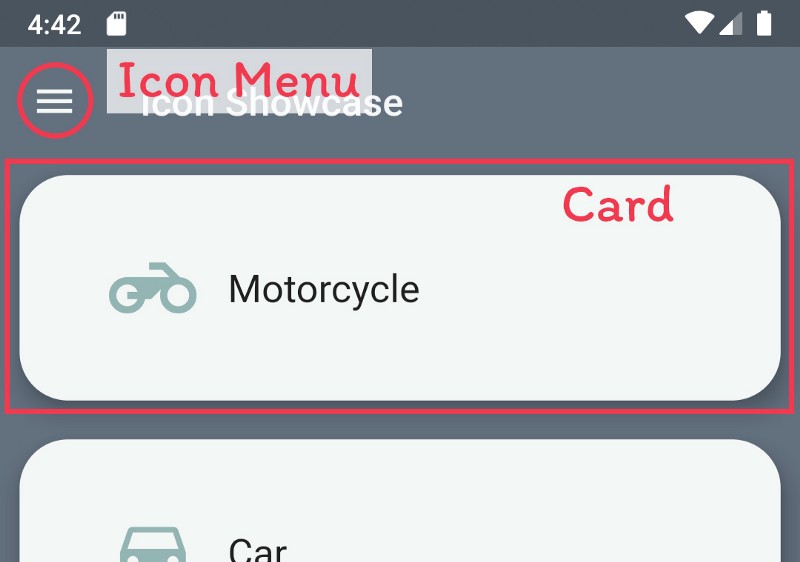
- ที่ Card แต่ละอันใน ListView
- ที่ Icon Menu ที่อยู่ด้านซ้ายของ Appbar
และสุดท้าย เราจะแก้ transition ระหว่างเปลี่ยนหน้าให้ดูกลมกลืนขึ้นด้วย
--
อนิเมชั่นสำหรับ Card
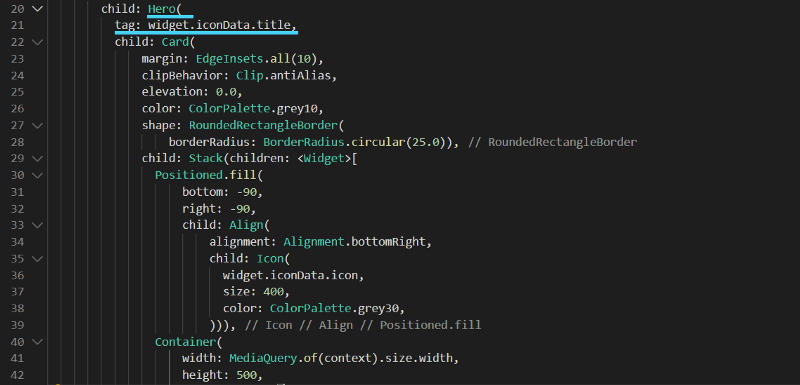
เราเริ่มจากง่ายๆก่อน เอา Widget Hero ไปหุ้ม Card ทั้งในหน้า
main.dartdetail_page.dart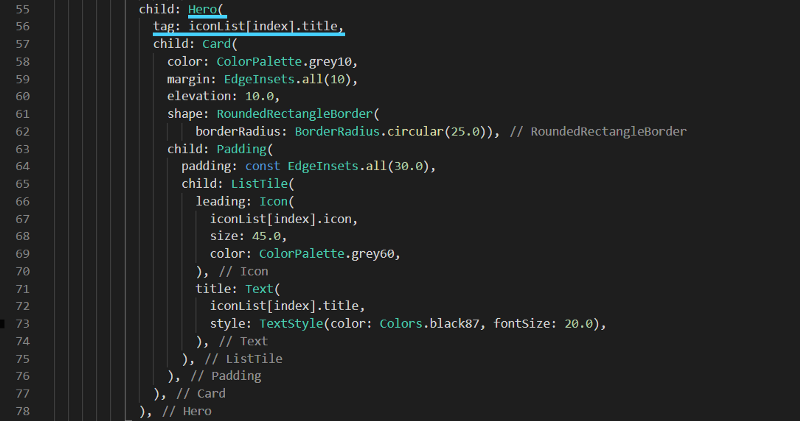
แล้วผลลัพธ์ที่ได้
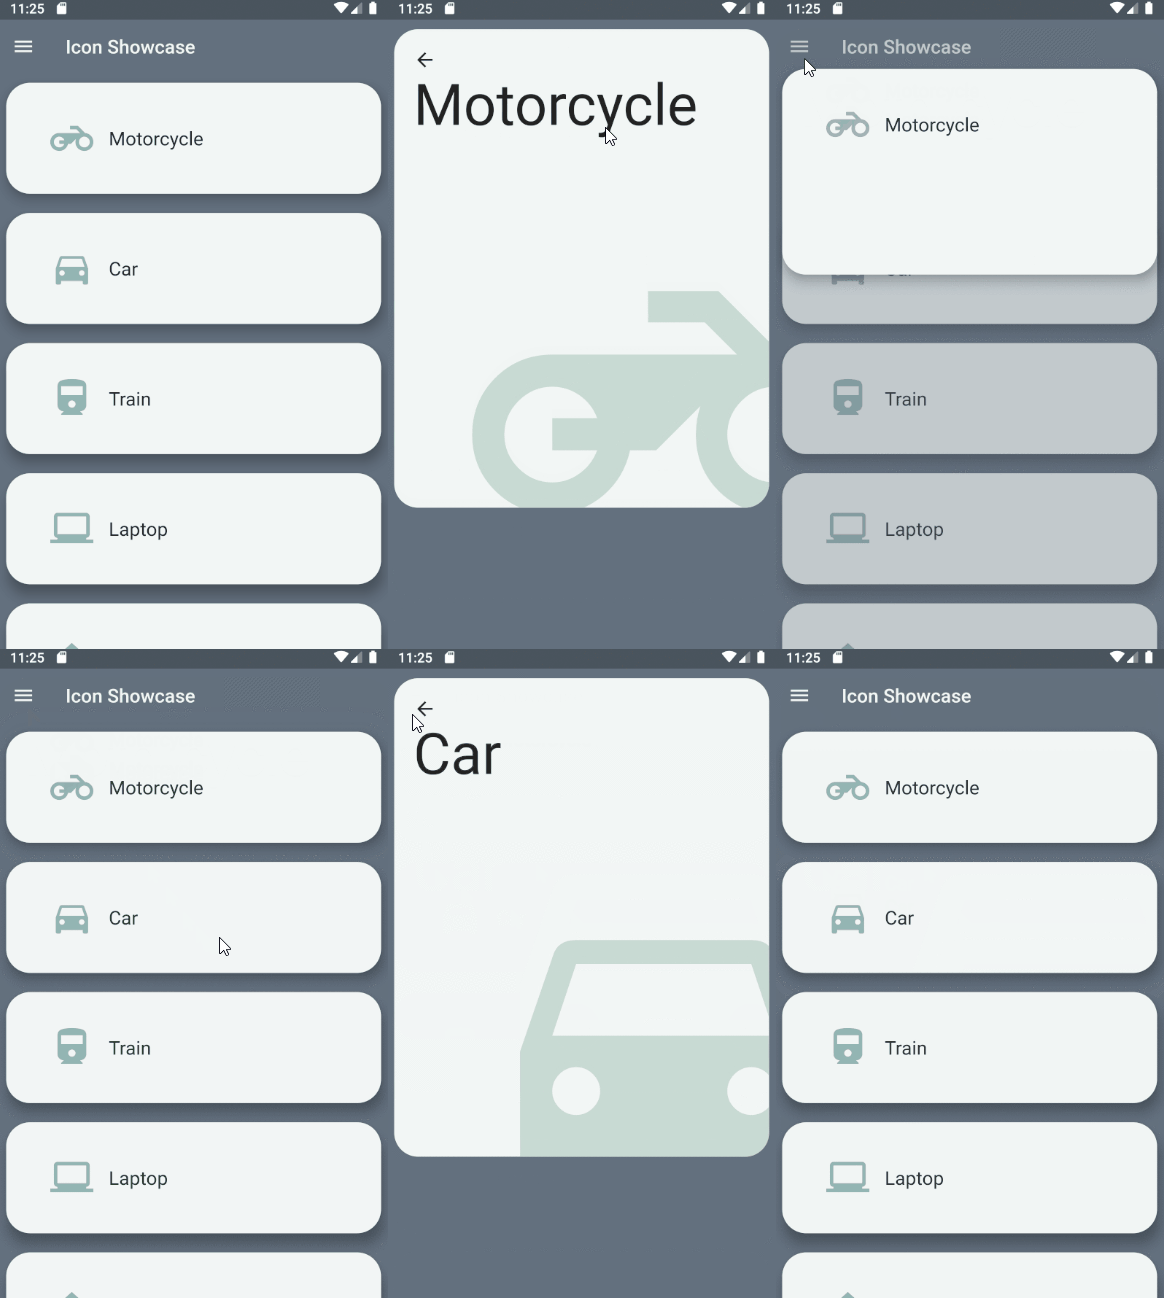
ผลลัพธ์ก็ไม่ได้ออกมาดูแย่เลย แต่ถ้าเราอยากไปให้สุดกว่านี้ เราก็จะทำให้หัวข้อกับไอคอน ขยับตามไปด้วยจากตำแหน่งในหน้าก่อนหน้าไปหน้าถัดไป แต่ปัญหาคือ จู่ๆ เราจะครอบ Hero ให้ Text กับ Icon เลยไม่ได้ เพราะตอนนี้ทั้งคู่เป็น Widget ลูกหลาน ใน Hero ก่อนหน้าไปแล้ว เราไม่สามารถ ครอบ Hero ซ้อน Hero ได้ 1
ทางแก้ของเราคือ แทนที่จะมอง Card ของเราเป็นชิ้นเดียว เราใช้ Stack แยกเป็น 3 ชั้นซ้อนกันแทน จากบนลงล่าง หัวข้อ ไอค่อน พื้นหลัง ซึ่งจะเพิ่มงานให้เราหน่อย แต่เพื่อความงาม ก็จัดไป
ที่ main.dart
เราจะแทนที่ Card ด้วย Stack หรือแก้โค๊ตกลายเป็นด้านล่างเลย
| import 'package:flutter/material.dart'; | |
| import 'package:icon_showcase_animation_part/color_palette.dart'; | |
| import 'package:icon_showcase_animation_part/icon_data.dart'; | |
| import 'package:icon_showcase_animation_part/detail_page.dart'; | |
| void main() => runApp(MyApp()); | |
| class MyApp extends StatelessWidget { | |
| @override | |
| Widget build(BuildContext context) { | |
| return MaterialApp( | |
| title: 'Icon Showcase', | |
| theme: ThemeData( | |
| primarySwatch: Colors.blue, | |
| ), | |
| home: MyHomePage(title: 'Icon Showcase'), | |
| debugShowCheckedModeBanner: false, | |
| ); | |
| } | |
| } | |
| class MyHomePage extends StatefulWidget { | |
| MyHomePage({Key key, this.title}) : super(key: key); | |
| final String title; | |
| @override | |
| _MyHomePageState createState() => _MyHomePageState(); | |
| } | |
| class _MyHomePageState extends State<MyHomePage> { | |
| @override | |
| Widget build(BuildContext context) { | |
| return Scaffold( | |
| backgroundColor: ColorPalette.grey90, | |
| appBar: AppBar( | |
| backgroundColor: Colors.transparent, | |
| elevation: 0.0, | |
| title: Text( | |
| widget.title, | |
| style: TextStyle(color: ColorPalette.grey10), | |
| ), | |
| leading: Icon( | |
| Icons.menu, | |
| color: ColorPalette.grey10, | |
| ), | |
| ), | |
| body: ListView.builder( | |
| itemCount: iconList.length, | |
| itemBuilder: (context, index) => InkWell( | |
| onTap: () => Navigator.of(context).push(MaterialPageRoute( | |
| builder: (context) => DetailPage( | |
| iconData: iconList[index], | |
| ))), | |
| child: Stack(children: <Widget>[ | |
| Hero( | |
| tag: iconList[index].title, | |
| child: Card( | |
| color: ColorPalette.grey10, | |
| margin: EdgeInsets.all(10), | |
| elevation: 10.0, | |
| shape: RoundedRectangleBorder( | |
| borderRadius: BorderRadius.circular(25.0)), | |
| child: Padding( | |
| padding: const EdgeInsets.all(30.0), | |
| child: ListTile( | |
| leading: Icon( | |
| iconList[index].icon, | |
| size: 45.0, | |
| color: Colors.transparent, | |
| ), | |
| ), | |
| )), | |
| ), | |
| Padding( | |
| padding: const EdgeInsets.all(40.0), | |
| child: ListTile( | |
| title: Hero( | |
| tag: 'title\${iconList[index].title}', | |
| child: Text( | |
| iconList[index].title, | |
| style: TextStyle( | |
| color: Colors.black87, fontSize: 20.0), | |
| ), | |
| ), | |
| leading: Hero( | |
| tag: 'icon\${iconList[index].title}', | |
| child: Icon( | |
| iconList[index].icon, | |
| size: 45.0, | |
| color: ColorPalette.grey60, | |
| ), | |
| )), | |
| ), | |
| ]), | |
| ), | |
| )); | |
| } | |
| } |
ที่ detail_page.dart
เราก็ทำคล้ายๆ กัน
| import 'package:icon_showcase_animation_part/color_palette.dart'; | |
| import 'package:icon_showcase_animation_part/icon_data.dart'; | |
| import 'package:flutter/material.dart'; | |
| class DetailPage extends StatefulWidget { | |
| final IconModel iconData; | |
| DetailPage({Key key, @required this.iconData}) : super(key: key); | |
| @override | |
| _DetailPageState createState() => _DetailPageState(); | |
| } | |
| class _DetailPageState extends State<DetailPage> { | |
| @override | |
| Widget build(BuildContext context) { | |
| return Scaffold( | |
| backgroundColor: ColorPalette.grey90, | |
| body: SafeArea( | |
| child: Stack(children: <Widget>[ | |
| Hero( | |
| tag: widget.iconData.title, | |
| child: Card( | |
| margin: EdgeInsets.all(10), | |
| elevation: 10.0, | |
| shape: RoundedRectangleBorder( | |
| borderRadius: BorderRadius.circular(25.0)), | |
| child: Stack(children: <Widget>[ | |
| Container( | |
| width: MediaQuery.of(context).size.width, | |
| height: 500, | |
| child: SizedBox()), | |
| ])), | |
| ), | |
| Hero( | |
| tag: 'icon\${widget.iconData.title}', | |
| child: Card( | |
| margin: EdgeInsets.all(10), | |
| clipBehavior: Clip.antiAlias, | |
| elevation: 0.0, | |
| color: Colors.transparent, | |
| shape: RoundedRectangleBorder( | |
| borderRadius: BorderRadius.circular(25.0)), | |
| child: Stack(children: <Widget>[ | |
| Positioned.fill( | |
| bottom: -90, | |
| right: -90, | |
| child: Align( | |
| alignment: Alignment.bottomRight, | |
| child: Icon( | |
| widget.iconData.icon, | |
| size: 400, | |
| color: ColorPalette.grey30, | |
| ))), | |
| Container( | |
| width: MediaQuery.of(context).size.width, | |
| height: 500, | |
| child: Padding( | |
| padding: const EdgeInsets.only(left: 20.0, top: 20.0), | |
| child: SizedBox())), | |
| ])), | |
| ), | |
| Card( | |
| margin: EdgeInsets.all(10), | |
| clipBehavior: Clip.antiAlias, | |
| elevation: 0.0, | |
| color: Colors.transparent, | |
| shape: RoundedRectangleBorder( | |
| borderRadius: BorderRadius.circular(25.0)), | |
| child: Stack(children: <Widget>[ | |
| Container( | |
| width: MediaQuery.of(context).size.width, | |
| height: 500, | |
| child: Padding( | |
| padding: const EdgeInsets.only(left: 20.0, top: 20.0), | |
| child: Column( | |
| crossAxisAlignment: CrossAxisAlignment.start, | |
| children: <Widget>[ | |
| InkWell( | |
| onTap: () { | |
| Navigator.of(context).pop(true); | |
| return Future.value(false); | |
| }, | |
| child: Icon( | |
| Icons.arrow_back, | |
| ), | |
| ), | |
| Hero( | |
| tag: 'title\${widget.iconData.title}', | |
| child: Text( | |
| widget.iconData.title, | |
| style: TextStyle( | |
| color: Colors.black87, fontSize: 60.0), | |
| ), | |
| ), | |
| ], | |
| ), | |
| )), | |
| ])), | |
| ]), | |
| ), | |
| ); | |
| } | |
| } |
ผลลัพธ์เริ่มคล้ายที่เราตั้งเป้าแล้ว
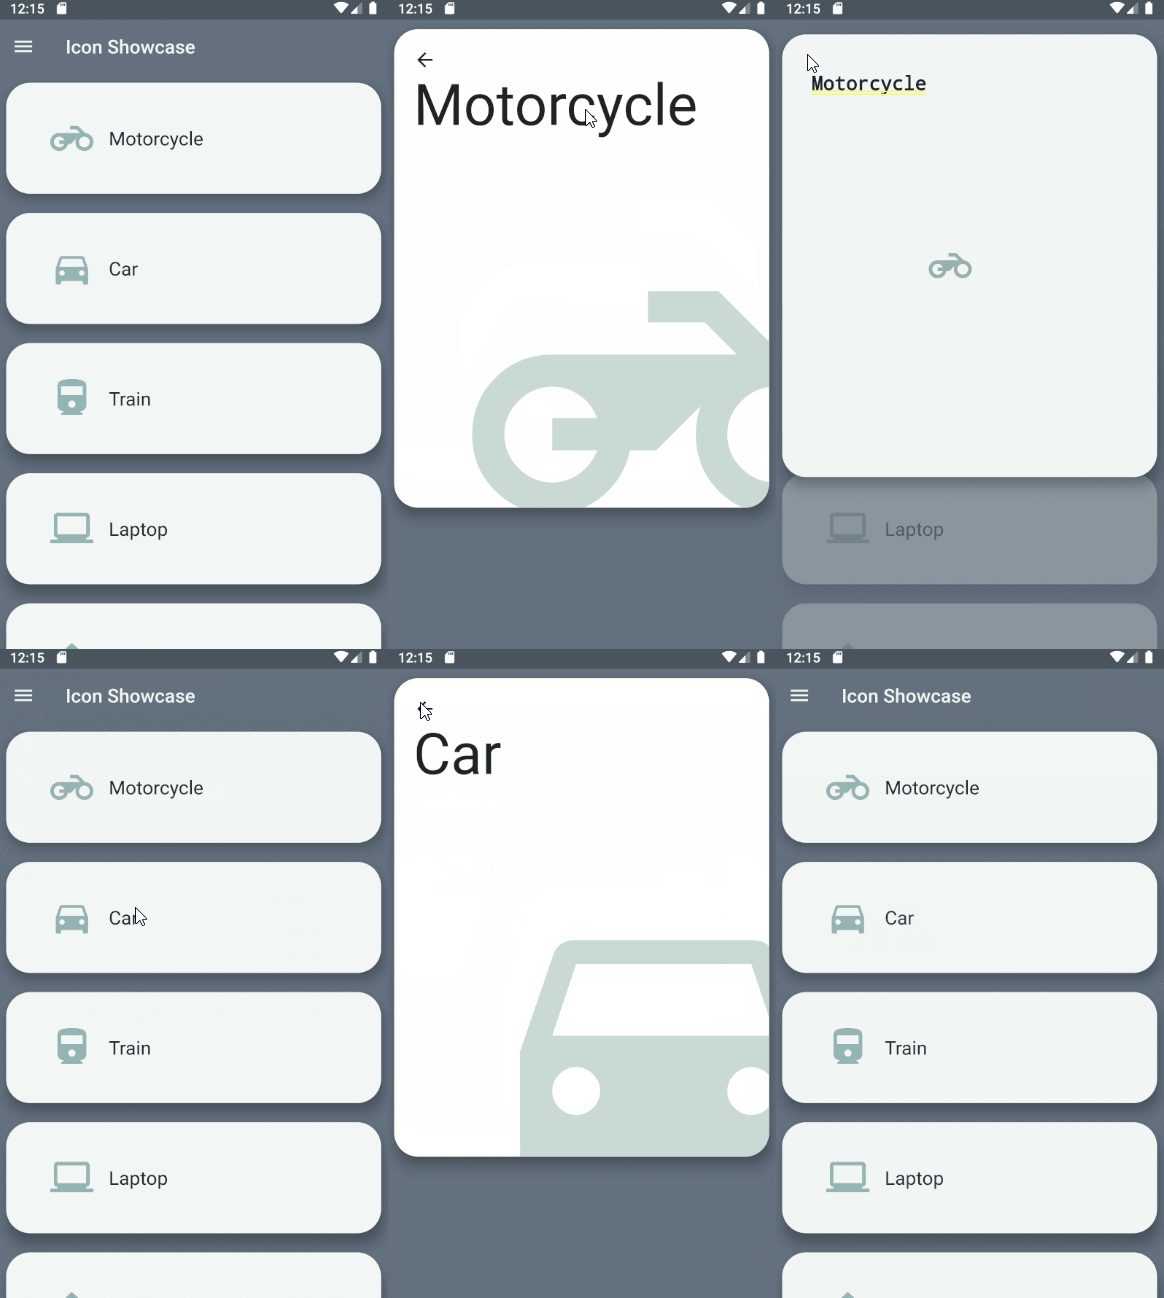
แต่!!!! เห็นตัวอักษรแสดงแปลกๆ ไหม เพราะ อีกปัญหากับ Hero คือมันไม่ได้ถูกดีไซน์ให้ใช้กับ Text ตั้งแต่แรกเริ่ม แต่ก็ใช่ว่าจะแก้ไม่ได้ ทางออกก็มีแบบหยาบ กับทำให้เนียนเลย แบบหยาบก่อน เราจะเอา Text ทั้งในหน้า
main.dartdetail_page.darttype: MaterialType.transparency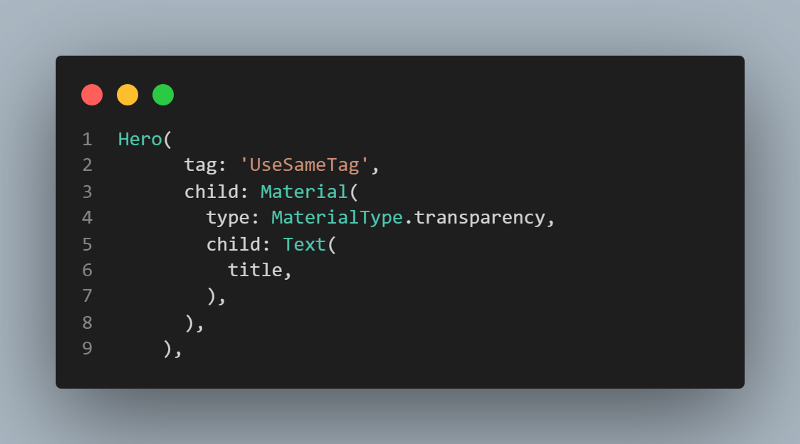
ประมาณนี้ อันนี้ไปลองเอาเอง วิธีนี้จะพบเฉพาะปัญหา Text Overflow เวลา transition ทำงาน
ทางแก้ที่ดีกว่า แต่ก็ยาวกว่าเยอะคือ เราจะต้องไปแก้ flightShuttleBuilder ของ Hero ซึ่งเราก็ต้องมาทำอนิเมชั่นให้กับ Text ของเราเอง Hero จะได้เอาตัวนี้ไปใช้แทน
หลักการของเรา คือ เราจะสร้าง Widget ให้ Text ที่จะมี 4 สถานะ enlarge(กำลังขยายขนาด), enlarged(ค้างที่ขนาดใหญ่), shrink(กำลังย่อส่วน), shrunk(ค้างที่ขนาดเล็ก) เราจะใช้ชื่อเหล่านี้เรียกสถานะ ดังนั้น เราเลยสร้างไฟล์ใหม่ขึ้นมา จะประกอบไปด้วย enum พวกนี้ ชื่อไฟล์ว่า
view_state.dart| enum ViewState { | |
| enlarge, | |
| enlarged, | |
| shrink, | |
| shrunk, | |
| } |
เรามาสร้างตัว Widget ให้ Text ต่อ สร้างไฟล์ใหม่ชื่อว่า
title_hero_flight.dart| import 'package:flutter/material.dart'; | |
| import 'package:icon_showcase_animation_part/view_state.dart'; | |
| class DestinationTitleContent extends StatelessWidget { | |
| final String text; | |
| final double fontSize; | |
| final int maxLines; | |
| final TextOverflow overflow; | |
| final bool isOverflow; | |
| final Color color; | |
| const DestinationTitleContent({ | |
| Key key, | |
| this.text, | |
| this.fontSize, | |
| this.maxLines, | |
| this.overflow, | |
| this.isOverflow, | |
| this.color, | |
| }) : super(key: key); | |
| Widget _buildTitleText() => Text( | |
| text, | |
| maxLines: maxLines, | |
| overflow: overflow, | |
| style: TextStyle( | |
| color: color, | |
| fontSize: fontSize, | |
| ), | |
| ); | |
| @override | |
| Widget build(BuildContext context) { | |
| return Material( | |
| color: Colors.transparent, | |
| child: isOverflow | |
| ? OverflowBox( | |
| alignment: Alignment.topLeft, | |
| maxWidth: double.infinity, | |
| maxHeight: double.infinity, | |
| child: _buildTitleText(), | |
| ) | |
| : _buildTitleText(), | |
| ); | |
| } | |
| } | |
| class DestinationTitle extends StatefulWidget { | |
| final String title; | |
| final ViewState viewState; | |
| final double smallFontSize; | |
| final double largeFontSize; | |
| final int maxLines; | |
| final TextOverflow textOverflow; | |
| final bool isOverflow; | |
| final Color color; | |
| const DestinationTitle( | |
| {Key key, | |
| @required this.title, | |
| @required this.viewState, | |
| this.smallFontSize = 15.0, | |
| this.largeFontSize = 48.0, | |
| this.maxLines = 2, | |
| this.textOverflow = TextOverflow.ellipsis, | |
| this.isOverflow = false, | |
| this.color = Colors.black}) | |
| : super(key: key); | |
| @override | |
| _DestinationTitleState createState() => _DestinationTitleState(); | |
| } | |
| class _DestinationTitleState extends State<DestinationTitle> | |
| with SingleTickerProviderStateMixin { | |
| AnimationController _animationController; | |
| Animation<double> _fontSizeTween; | |
| double fontSize; | |
| @override | |
| void initState() { | |
| super.initState(); | |
| _animationController = AnimationController( | |
| vsync: this, | |
| duration: Duration(milliseconds: 500), | |
| )..addListener(() { | |
| setState(() { | |
| fontSize = _fontSizeTween.value; | |
| }); | |
| }); | |
| switch (widget.viewState) { | |
| case ViewState.enlarge: | |
| _fontSizeTween = Tween<double>( | |
| begin: widget.smallFontSize, | |
| end: widget.largeFontSize, | |
| ).animate( | |
| CurvedAnimation( | |
| parent: _animationController, | |
| curve: Curves.easeInOutSine, | |
| ), | |
| ); | |
| _animationController.forward(from: 0.0); | |
| break; | |
| case ViewState.enlarged: | |
| fontSize = widget.largeFontSize; | |
| break; | |
| case ViewState.shrink: | |
| _fontSizeTween = Tween<double>( | |
| begin: widget.largeFontSize, | |
| end: widget.smallFontSize, | |
| ).animate( | |
| CurvedAnimation( | |
| parent: _animationController, | |
| curve: Curves.easeInOutSine, | |
| ), | |
| ); | |
| _animationController.forward(from: 0.0); | |
| break; | |
| case ViewState.shrunk: | |
| fontSize = widget.smallFontSize; | |
| break; | |
| } | |
| } | |
| @override | |
| void dispose() { | |
| _animationController.dispose(); | |
| super.dispose(); | |
| } | |
| @override | |
| Widget build(BuildContext context) { | |
| return DestinationTitleContent( | |
| text: widget.title, | |
| fontSize: fontSize, | |
| maxLines: widget.maxLines, | |
| overflow: widget.textOverflow, | |
| isOverflow: widget.isOverflow, | |
| color: widget.color); | |
| } | |
| } |
เราค่อยๆมา อธิบายไปทีละส่วนกัน
- class DestinationTitleContent จะทำหน้าที่รับผิดชอบในการสร้าง Widget Text ณ เวลาหนึ่งๆ โดยจะรับ ข้อความ ขนาดฟอร์ต จำนวนบรรทัด overflow isOverflow สี
- class DestinationTitle จะทำหน้าที่เอาข้อความที่สร้างจาก class DestinationTitleContent สร้างข้อความนิ่ง หรืออนิเมชั่น ขึ้นกับ ViewState ที่ส่งมา คลาสนี้จึงจำเป็นต้องรับ ViewState ขนาดฟอร์ตทั้งเล็ก และใหญ่เข้ามาด้วย สำหรับ ViewState.enlarge กับ ViewState.shrink ที่มีอนิเมชั่น AnimationController จะเข้ามาจัดการส่วนนี้ ซึ่งขอละคำอธิบายในส่วนนี้ไปก่อน
ใครตามมาถึงจุดนี้แล้วงงเป็นพิเศษ ก็แนะนำให้อย่าพึ่งไปคิดไรมาก ก็อปทั้งไฟล์
title_hero_flight.dartเราจะกลับไปที่
main.dartdetail_page.dartแก้ Hero ที่มี Text ให้เป็นตามนี้
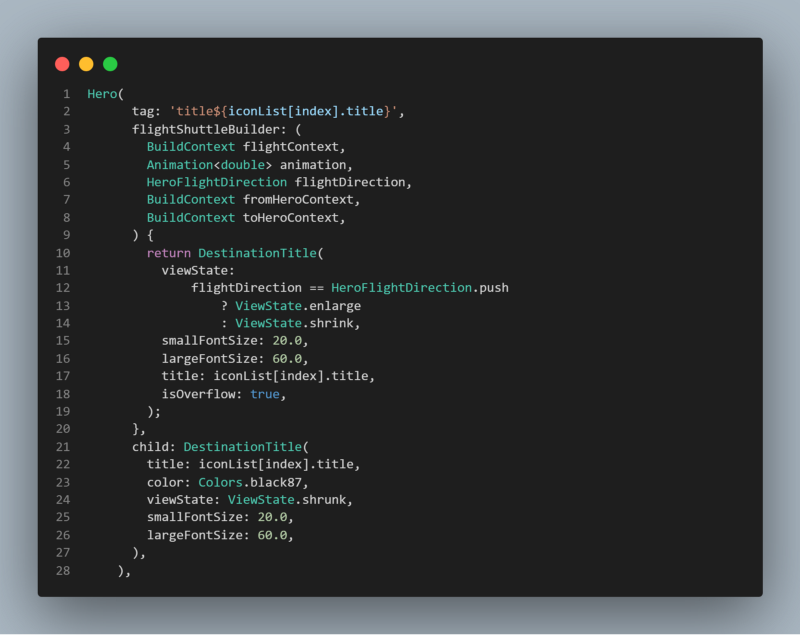
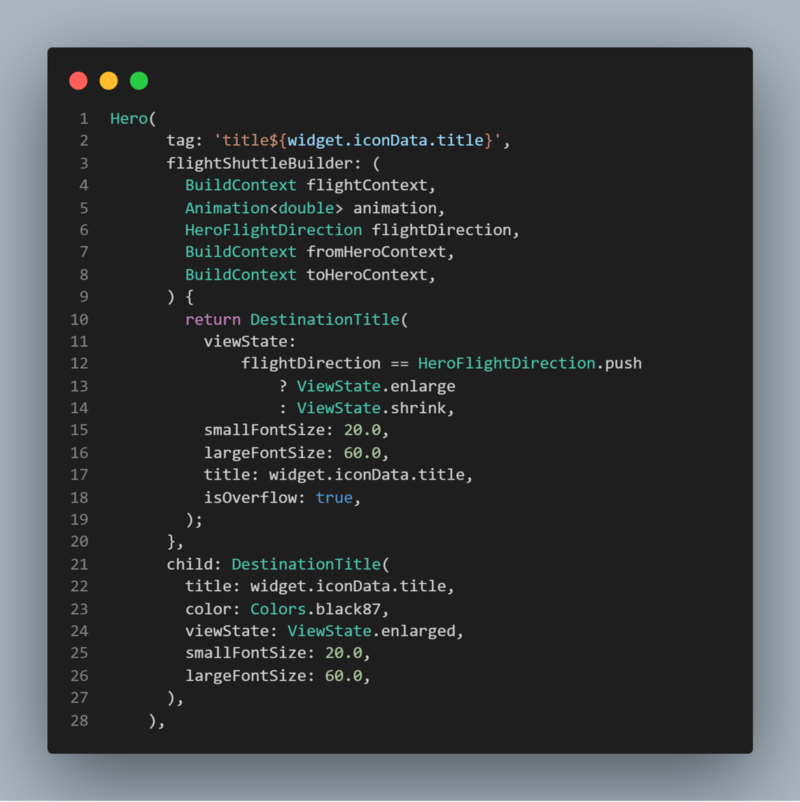
สังเกตว่าใน flightShuttleBuilder เราจะ return DestinationTitle ที่มี ViewState ไม่ enlarge ก็ shrink เพราะ flightShuttleBuilder จะถูกเรียกขณะที่มี transition เปลี่ยนหน้าเกิดขึ้น ส่วน child เราจะส่ง DestinationTitle ที่มี ViewState enlarged กับ shrank ตามหน้าที่ต้องแสดง
เสร็จเรียบร้อยในส่วนของ Card แล้ว ไปกันต่อ
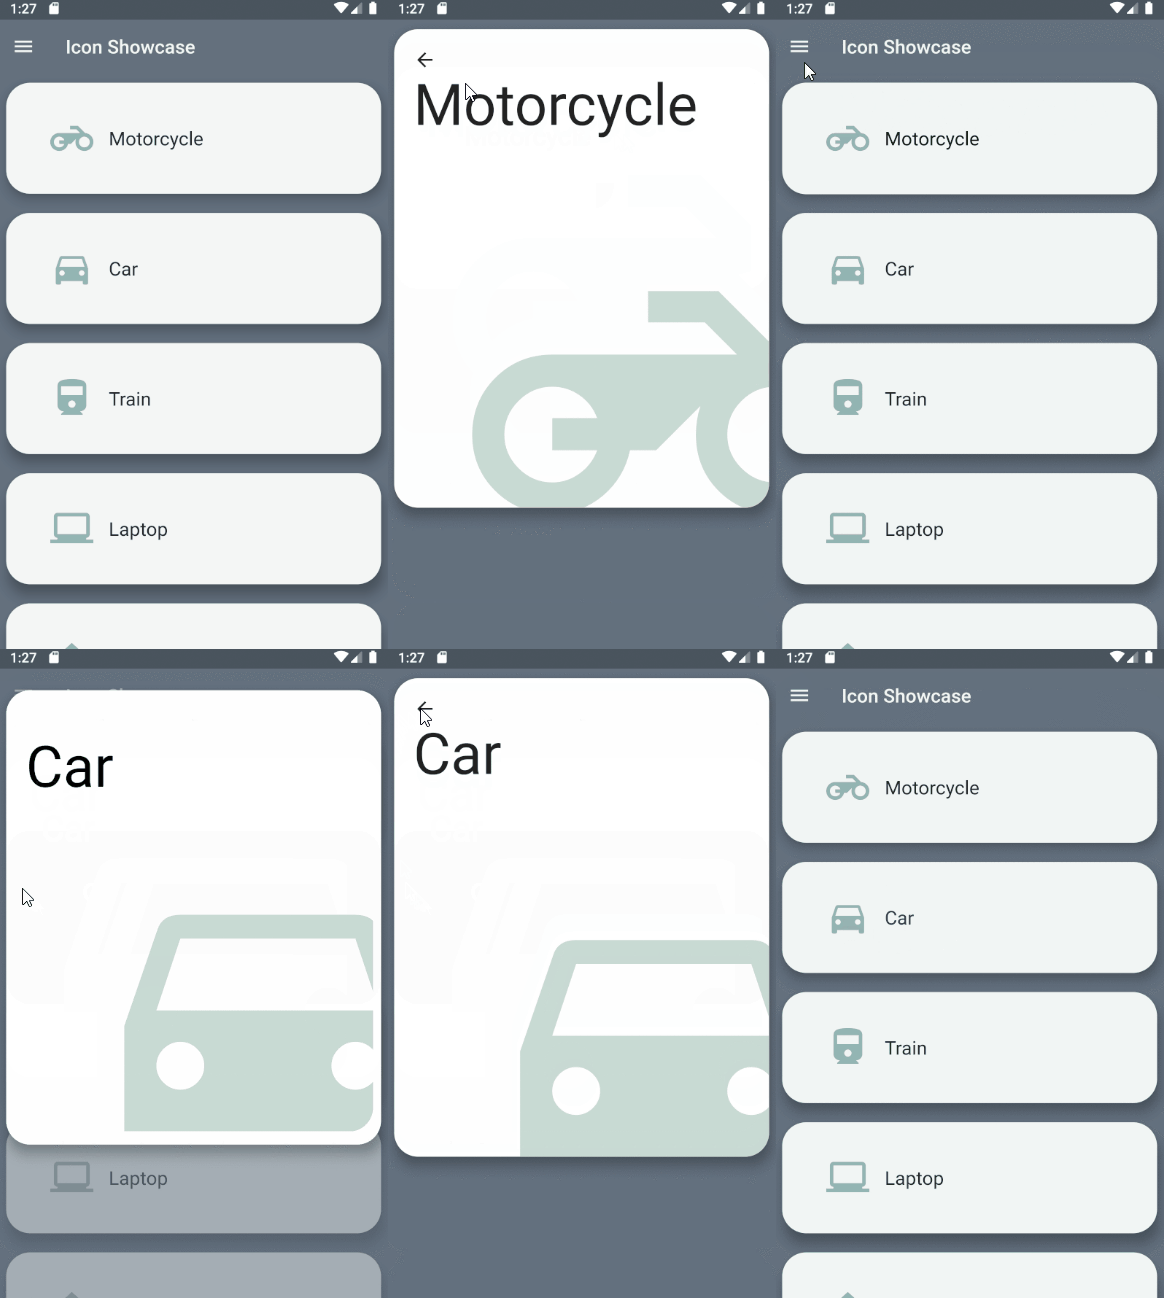
อนิเมชั่นสำหรับ Icon Menu
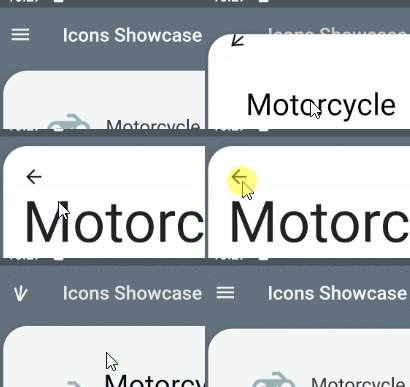
ในส่วนนี้ก็ไม่ค่อยยุ่งยากมากแล้ว แต่ต้องใช้ AnimationController ดังนั้นมาเริ่มกันเลยที่
main.dart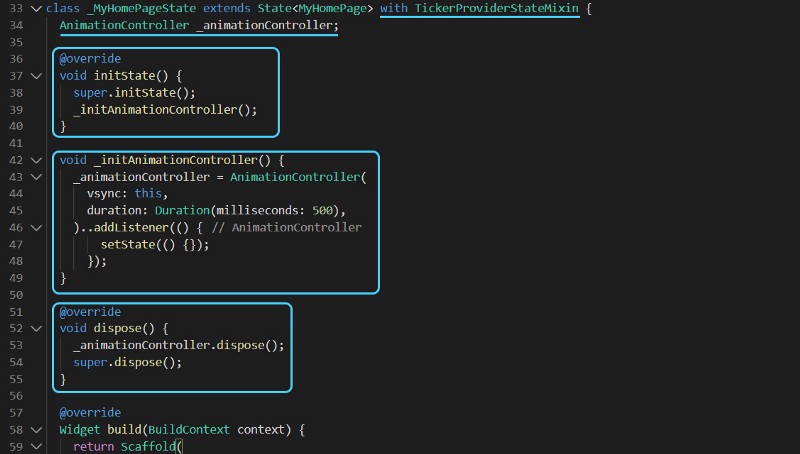
เราจะเพิ่มที่ขีดเส้นใต้ 2 อัน และกล่อง 3 กล่องลงไปใน class _MyHomePageState
ฟังก์ชั่น
_initAnimationController()initState()_dispose()_หลังจากสร้าง _animationController เสร็จ เราก็เอามันมาใช้เวลาจะเปลี่ยนหน้าไป-กลับ แต่ก่อนหน้านั้น เราจำเป็นต้องเปลี่ยนไอคอน จากภาพนิ่งเฉยๆให้ มีอนิเมชั่นด้วย ซึ่ง Flutter ก็มีให้เราใช้ AnimatedIcon ดังนั้นเราก็เปลี่ยนเลย

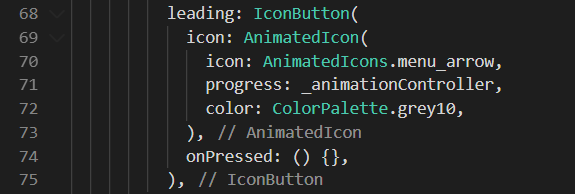
แล้วสุดท้ายไปเพิ่ม
_animationController.forward(from: 0.0);DetailPage_animationController.reverse(from: 1.0);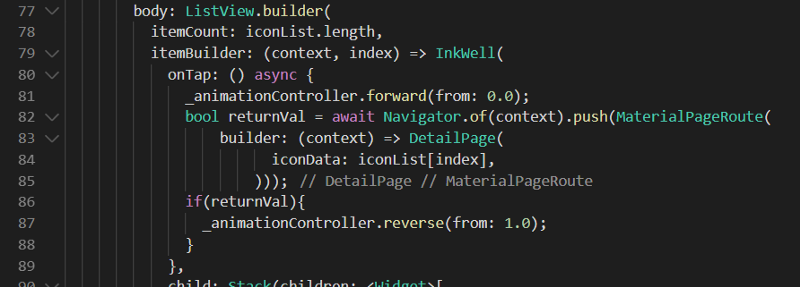
และทำแบบเดียวกันในหน้า
detail_page.dart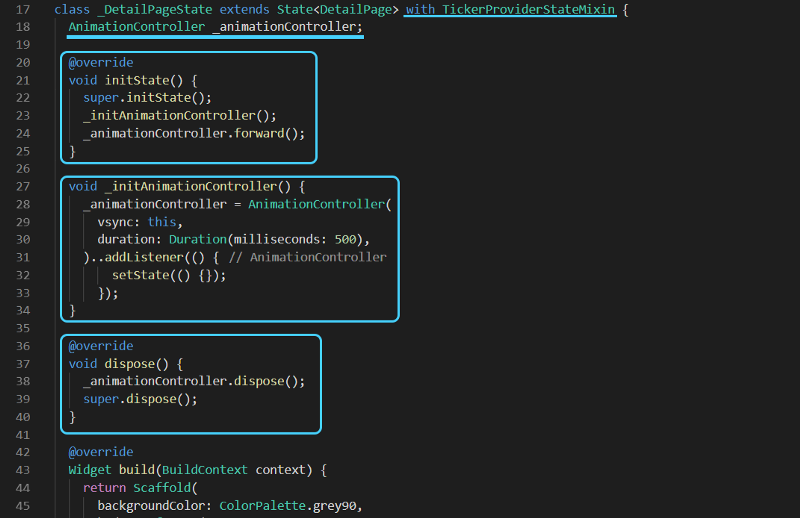
มีความแตกต่างเล็กน้อยเมื่อ
initState()_animationController.forward()แล้วอย่าลืมเปลี่ยนไอคอนเดิมให้กลายเป็น AnimatedIcon ด้วย

จากจุดนี้จะพบว่าอนิเมชั่นเราจะทำงานแล้ว แต่ตำแหน่งของมันยังไม่เคลื่อนตาม ไม่พอยังโดนทับอีก
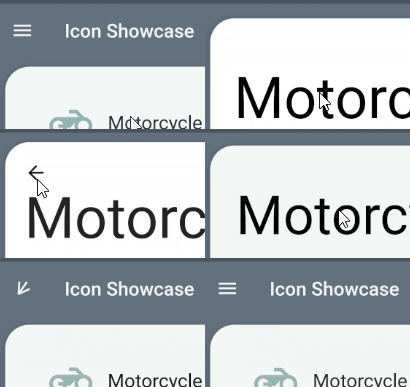
ทางแก้รอบนี้ง่ายเลย เอา Widget Hero หุ้ม AnimatedIcon ทั้งสองหน้า และอย่าลืมตั้ง tag ให้เหมือนกัน

แค่นี้ก็เรียบร้อย
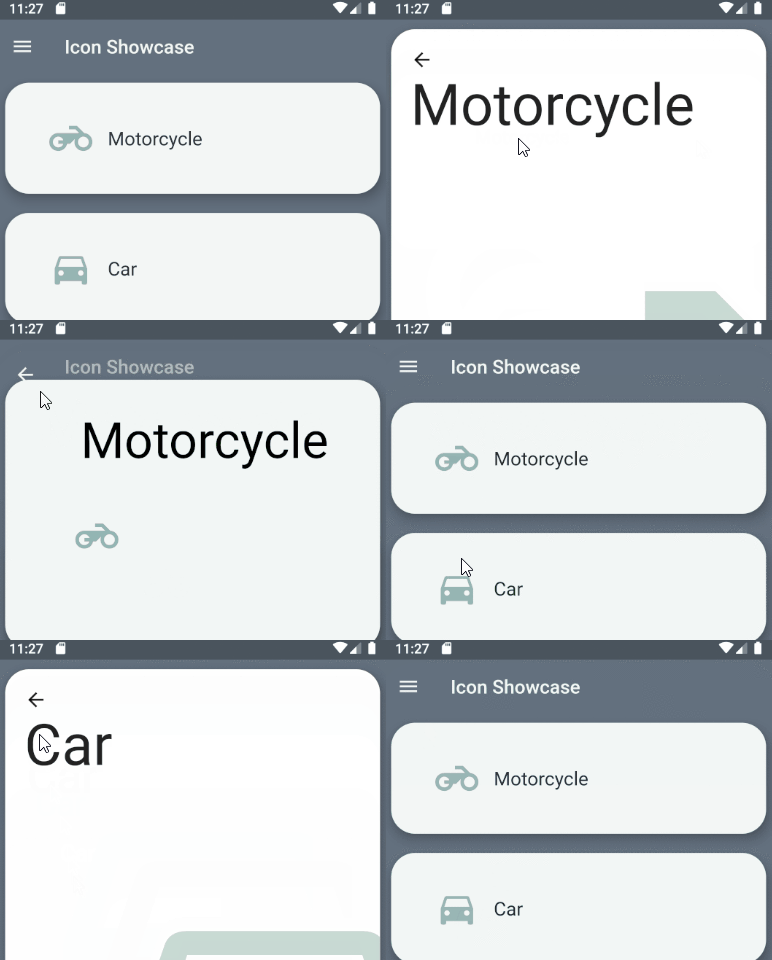
(แถม) เพื่อความสมูทอีกนิด แก้ transition เปลี่ยนหน้า
เราจำเป็นต้องสร้าง transition ของเราเอง สร้างไฟล์ใหม่เรียก
fade_page_route.dart| import 'package:flutter/material.dart'; | |
| class FadePageRoute<T> extends PageRoute<T> { | |
| FadePageRoute({ | |
| @required this.builder, | |
| RouteSettings settings, | |
| this.maintainState = true, | |
| bool fullscreenDialog = false, | |
| }) : assert(builder != null), | |
| assert(maintainState != null), | |
| assert(fullscreenDialog != null), | |
| assert(opaque), | |
| super(settings: settings, fullscreenDialog: fullscreenDialog); | |
| /// Builds the primary contents of the route. | |
| final WidgetBuilder builder; | |
| @override | |
| final bool maintainState; | |
| @override | |
| Duration get transitionDuration => const Duration(milliseconds: 550); | |
| @override | |
| Color get barrierColor => null; | |
| @override | |
| String get barrierLabel => null; | |
| @override | |
| bool canTransitionFrom(TransitionRoute<dynamic> previousRoute) { | |
| return previousRoute is FadePageRoute; | |
| } | |
| @override | |
| bool canTransitionTo(TransitionRoute<dynamic> nextRoute) { | |
| // Don't perform outgoing animation if the next route is a fullscreen dialog. | |
| return (nextRoute is FadePageRoute && !nextRoute.fullscreenDialog); | |
| } | |
| @override | |
| Widget buildPage( | |
| BuildContext context, | |
| Animation<double> animation, | |
| Animation<double> secondaryAnimation, | |
| ) { | |
| final Widget result = builder(context); | |
| assert(() { | |
| if (result == null) { | |
| throw FlutterError( | |
| 'The builder for route "\${settings.name}" returned null.\ ' | |
| 'Route builders must never return null.'); | |
| } | |
| return true; | |
| }()); | |
| return Semantics( | |
| scopesRoute: true, | |
| explicitChildNodes: true, | |
| child: result, | |
| ); | |
| } | |
| @override | |
| Widget buildTransitions(BuildContext context, Animation<double> animation, | |
| Animation<double> secondaryAnimation, Widget child) { | |
| // final PageTransitionsTheme theme = Theme.of(context).pageTransitionsTheme; | |
| return _FadeInPageTransition(routeAnimation: animation, child: child); | |
| } | |
| @override | |
| String get debugLabel => '\${super.debugLabel}(\${settings.name})'; | |
| } | |
| class _FadeInPageTransition extends StatelessWidget { | |
| _FadeInPageTransition({ | |
| Key key, | |
| @required | |
| Animation<double> | |
| routeAnimation, // The route's linear 0.0 - 1.0 animation. | |
| @required this.child, | |
| }) : _opacityAnimation = routeAnimation.drive(_easeInTween), | |
| super(key: key); | |
| static final Animatable<double> _easeInTween = | |
| CurveTween(curve: Curves.easeIn); | |
| final Animation<double> _opacityAnimation; | |
| final Widget child; | |
| @override | |
| Widget build(BuildContext context) { | |
| return FadeTransition( | |
| opacity: _opacityAnimation, | |
| child: child, | |
| ); | |
| } | |
| } |
เราสามารถเปลี่ยนไปใช้ transition อื่นได้ แต่เราจะใช้ FadeTransition เพื่อความกลมกลืน นอกจากนี้ เราสามารถแก้ Duration กับ Curve ของ transition ได้ โดยเราจะตั้ง Duration ไว้ 550 millisecond และใช้ Curves.easeIn
พร้อมแล้ว เราก็จะใช้แทนที่ MaterialPageRoute ในหน้า
main.dart
ตอนนี้ แอปเราก็ออกมาดูดีแล้ว

จบไปอีกแอปนึง หวังว่าการแนะนำ Widget เหล่านี้ และการเล่นกับ Hero และ AnimationController จะช่วยทำให้รู้จักการทำอนิเมชั่นมากขึ้นไม่มากก็น้อย อย่างไรก็ตามแอปนี้ยังมีอีกหลายจุดให้เก็บตกอีก อย่างเช่น Icon ที่อยู่ใน Card ไม่ได้สเกลขนาดตามเมื่อเปลี่ยนหน้า หรือสี Icon บน Appbar ไม่ได้ค่อยๆเปลี่ยนตาม ก็ลองไปทำเพิ่มเองได้นะ 55 หรือใครลองทำตามแล้วไม่เข้าใจส่วนไหนก็พิมพ์คำถามลงด้านล่างได้เลย
ถ้าเกิดพยายามแก้โค๊ดตามแล้วงง หรืออยากข้ามเอาโค๊ดเต็มมาเทียบเลย ก็โหลดจากลิงค์ด้านล่างได้เลย
แนะนำเรื่องถัดไป
- บอกต่อความท้าทายการทำหุ่นยนต์ ผ่านน้องไอโกะกันเถอะ
- Flutter: ลองเขียนแอปสไตล์ BLoC Pattern สำหรับ Noob
- Flutter: ลองสร้าง Todo App โดยใช้ BLoC Pattern กัน
